
Introduction
Setting a timer for questions in Storyline 360 enhances the interactivity of your e-learning modules. By integrating JavaScript, you can easily add this functionality.
In this article, we guide you through the process of setting a timer for questions in Storyline 360 using JavaScript.
Understanding Articulate Storyline 360
What is Articulate Storyline 360?
Articulate Storyline 360 is a comprehensive e-learning authoring tool by Articulate. It allows creators to design interactive courses with various multimedia elements, quizzes, and engaging content, making it a favorite among instructional designers.
Key Features of Articulate Storyline 360
Storyline 360 boasts a range of features including drag-and-drop interactions, multimedia support, and responsive design. It also supports scripting through JavaScript, which provides advanced customization options for developers.
Why Use a Timer in E-Learning?
Adding a timer to your questions can increase the challenge and engagement level of your e-learning content. Timers can simulate real-life pressure situations, encouraging learners to think quickly and improve their decision-making skills.
Watch the video tutorial now and start implementing it in your eLearning course!
Click or tap on the play button below to watch the video for easier understanding.
Setting Up Your Articulate Storyline 360 Project
Before diving into the specifics of adding a timer, you need to have your Articulate Storyline project open. Ensure you have your questions set up and are ready to add the timer functionality.
Step-by-step guide on how to Set Character Limits Using JavaScript in articulate storyline 360:
Open your Articulate Storyline project file where you intend to implement a character limit for text entry fields.
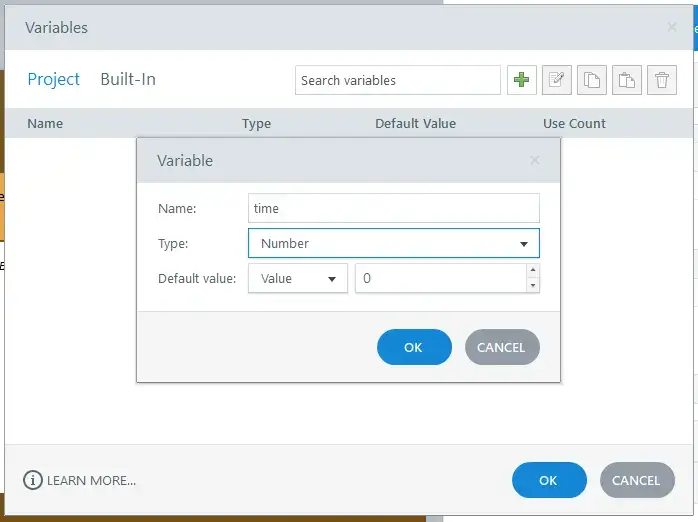
Step 1: Creating a Variable
1. Accessing the “Triggers” Panel
a. Open your Articulate Storyline project file.
b. On the right side of the screen, locate and access the “Triggers” panel.
2. Managing Project Variables
a. Within the “Triggers” panel, select “Manage Project Variables.”
3. Creating a New Variable
a. Click on “Create a new variable.”
b. Name the variable as “time” and set its type to “Number” with a default value of 0.
Step 2: Embed JavaScript into the Storyline Project
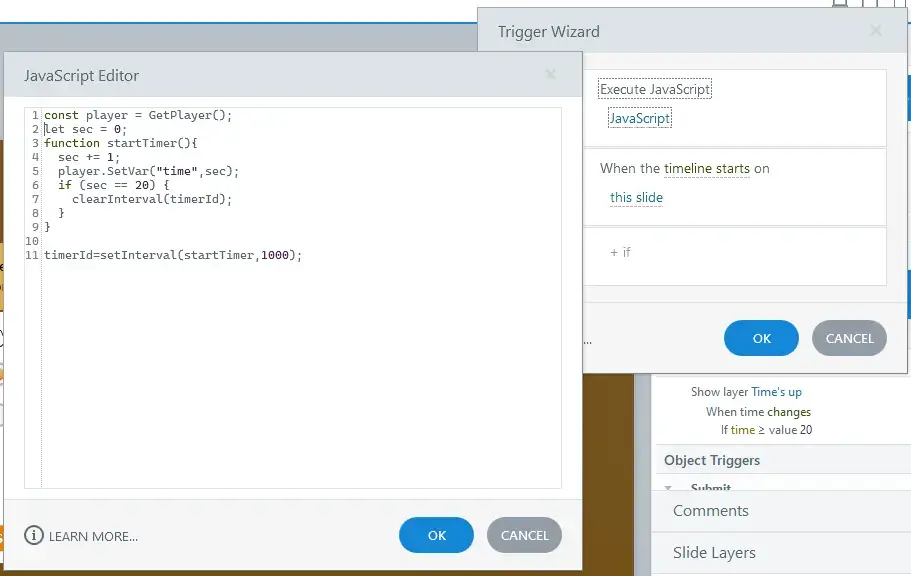
1. Creating a New Trigger
a. Select “Create a New Trigger.”
b. Configure the trigger action to “Execute JavaScript.”
2. Inserting the JavaScript Code
a. Copy and paste the following JavaScript code into your Storyline project:
JavaScript code for the Timer
const player = GetPlayer();
let sec = 0;
function startTimer(){
sec += 1;
player.SetVar(“time”, sec);
if (sec == 20) {
clearInterval(timerId);
}
}
timerId = setInterval(startTimer, 1000);
This code initializes a timer that updates the variable “time” every second, stopping at 20 seconds. You can adjust the duration according to your needs.
Make sure that the function executes when the timeline starts on this slide.

Step 3: Adding a Trigger to Show the Time’s Up Layer
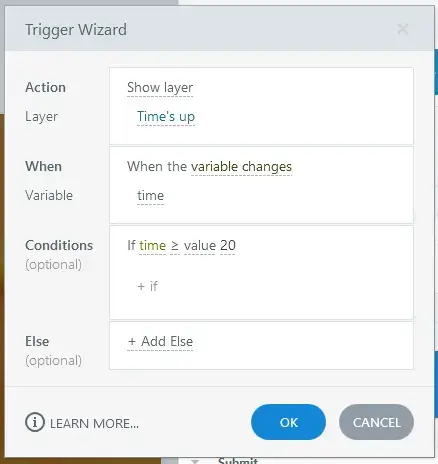
1. Creating a New Trigger for the “Time’s Up” Layer
a. Select “Create a New Trigger.”
b. Configure the action to “Show layer.”
2. Configuring the Trigger Conditions
a. Set the trigger to activate when the variable “time” changes.
b. Add a condition: the variable “time” should be greater than or equal to 20.
Step 4: Preview and Test
1. Previewing Your Project
a. Preview your Storyline project to ensure everything is set up correctly.
2. Testing Functionality
a. Make sure the timer starts when the timeline begins.
b. Ensure that users cannot attempt the question after 20 seconds.
c. Verify that the “time” variable updates accurately and the timer stops at the specified duration.
Troubleshooting Common Issues
1. Timer Not Starting
a. Double-check the JavaScript code and ensure the trigger is set to execute when the timeline starts.
2. Timer Not Stopping
a. Ensure the condition in the JavaScript code correctly stops the timer.
3. Time’s Up Layer Not Showing
a. Verify the trigger conditions are correctly set for the “Time’s up” layer to appear when the time variable reaches 20.
Summary
Setting a timer for questions in Storyline 360 using JavaScript is a powerful way to enhance your e-learning content. By following the steps outlined in this article, you can create engaging and effective timed quizzes, exams, and simulations. Experiment with different settings and features to find what works best for your learners.
eLearning Services
Elearning Solutions
From custom course development to LMS integration, our eLearning solutions provide everything you need for effective digital learning.
Learn more about our Elearning Solutions.
Elearning Translation and Localization
We provide end-to-end eLearning translation and localization services to help you deliver engaging content to a diverse global audience.
Learn more about our Elearning Translation and Localization.
Frequently Asked Questions (FAQs)
Q1. How can I add a countdown timer to a Storyline 360 slide?
A. You can add a countdown timer by inserting a JavaScript code snippet into the slide’s trigger panel. Ensure you update the total time and display elements as needed.
Q2. How to reset the timer for each question?
A. To reset the timer, you can reinitialize the sec variable and restart the interval when a new question is loaded.
Q3. What happens if the user navigates away from the question?
A. The timer will continue to run unless you add additional code to pause or reset it when the user navigates away.
Q4. Can I adjust the timer duration?
A. Yes, you can adjust the duration by modifying the condition in the JavaScript code where the timer stops. Change the value 20 to your desired number of seconds.
Q5. How can I ensure the timer is accessible to all users?
A. Use screen reader-friendly alerts, provide alternative text descriptions, and ensure visual elements are easily distinguishable.


