How to Set Your Published Slide Course Resolution in Articulate Storyline?
Have you ever come across various storyline versions i.e., Storyline 1, 2, 3 and 360?
Articulate Storyline has evolved through several versions, each bringing new features and improvements to enhance the e-learning content development experience.
The different versions, such as Storyline 1, 2, 3, and 360, are designed to meet the evolving needs of instructional designers and e-learning developers.
Articulate Storyline 1:
1. Articulate Storyline 1 was the first version of the software.
2. Introduced in 2012, it laid the foundation for subsequent versions.
3. Included features for creating interactive and engaging e-learning courses.
Articulate Storyline 2:
1. Released in 2014, Storyline 2 brought several enhancements and new features.
2. Improved interactivity, animations, and the overall user interface.
3. Enhanced support for mobile devices and responsive design.
Articulate Storyline 3:
1. Storyline 3, released in 2017, continued the evolution of the software.
2. Focused on improving the development workflow and user experience.
3. Included new features to keep up with industry trends.
Articulate Storyline 360:
1. Articulate Storyline 360, released in 2016, is a part of the Articulate 360 suite.
2. A subscription-based model that includes continuous updates and new features.
3. Offers cloud-based collaboration and an enhanced responsive design interface.
4. Provides additional tools like Rise 360 for creating responsive courses.
Is there a default resolution for Articulate Storyline?
Yes, the obvious answer is the slide size, which is preset toThe default size in Articulate Storyline is 720 pixels width by and 540 pixels height.
Will that preset slide size is changeable or unchangeable?
Yes, of course! The slide size can be changed according to the requirement of the user.
How to Set Your Published Slide Course Resolution in Articulate Storyline?
In Articulate Storyline, you can set the published slide course resolution by adjusting the player size and story size. Here’s a step-by-step guide:
Follow the steps below to change your slide size the resolution.
Step 1: Go to Design tab on the ribbon and select Story Size option which is at the top left corner below the file option.
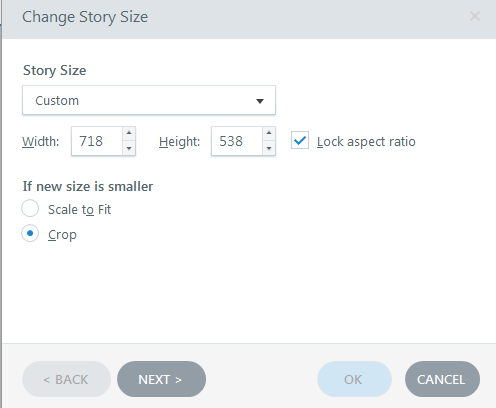
Step 2: A popup will appear on the screen called “Change Story Size” and select the size of the slide.
Step 3: Next, click on the Story Size drop-down and select if you want to customize the size of the slide.
Step 4: When you try to increase the size of the slide, you will be getting two more options in the window as “Scale to Fit” and “Fill Background”.
Step 5: Scale to Fit let your content fits in the new slide, whereas Fill Background option let you to select the ‘story position’ whether to top left, top right, bottom left, bottom right, etc.,
Step 6: Make sure to check the “Lock aspect ratio” box so as to avoid the rearranging of objects with respect to the changes in new slide.
Step 7: Next, try to decrease the slide size, you get two more options in the window as “Scale to fit” and “crop”. Scale to Fit, the content fits to your new slide size.
Step 8: Unlike Fill Background option here you have Crop For instance, select ‘Crop’ option and you can see Next button will be in active state.
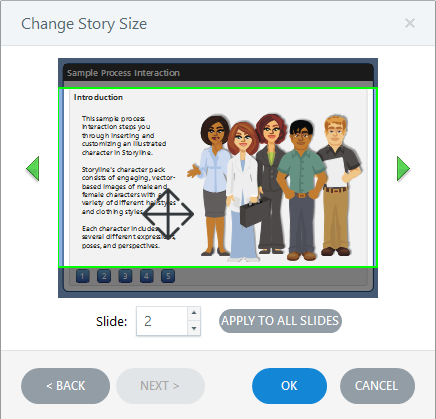
Step 9: Then, select the Next option, where you can see a crop area for each slide in your project.
Step 10: Change the position of the crop area by dragging the green color box.
Step 11: Then click on OK to accept the new slide changes.
This option in the Storyline gives you to set the story size to meet the device compatibility and the needs of the learners and to create custom elearning courses.
Our Services: eLearning Solutions, eLearning Translation and Localization Services, Blended Learning Solutions
How does Swift eLearning Services improve Articulate Storyline e-learning course development?
Swift eLearning services provide professional support for creating and managing digital learning experiences, including instructional design and e-learning content development.
Swift eLearning Services enhances Articulate Storyline e-learning course development through a strategic blend of expertise and innovation. Our team is dedicated to leveraging the full potential of Articulate Storyline, ensuring that your courses not only meet but exceed industry standards.
FREQUENTLY ASKED QUESTIONS (FAQS)
Why is it important to adjust the course resolution in Articulate Storyline?
Adjusting the course resolution in Articulate Storyline is crucial to ensure compatibility across different devices and screen sizes. It enhances the user experience by optimizing content visibility and responsiveness.
What is the recommended resolution for Articulate Storyline courses?
The recommended resolution for Articulate Storyline courses is 720 pixels by 540 pixels. This ensures a balanced display and optimal user experience across different devices.
Can I customize the resolution to fit specific device requirements in Articulate Storyline?
Yes, you can customize the resolution in Articulate Storyline to fit specific device requirements. Simply select the “Custom” option in the “Story Size” dropdown and enter the desired width and height for your project.
Does changing the resolution affect the quality of images and text in my Articulate Storyline course?
Changing the resolution in Articulate Storyline does impact the quality of images and text. It’s recommended to choose a resolution that balances file size and visual clarity for the intended audience and devices.
Can I change the resolution of individual slides within my Articulate Storyline project?
Yes, you can change the resolution of individual slides within your Articulate Storyline project. Select the slide you want to modify, go to the “Design” tab, and choose “Story Size” to set a custom resolution for that specific slide.
How can I set the resolution for my published slides in Articulate Storyline?
To set the resolution for your published slides in Articulate Storyline, follow these steps:
1. Open your Articulate Storyline project.
2. Navigate to the “Home” tab.
3. Click on “Player” to open the Player Features.
4. In the Player Features window, click on “Other” on the ribbon.
5. Choose “Resize browser to fill screen.”
Where can I find the “Story Size” option in Articulate Storyline?
In Articulate Storyline, locate the “Story Size” option under the “File” tab. It allows you to customize and set the resolution for your published slide course.
How can I preview the course to see how the resolution will appear before publishing in Articulate Storyline?
To preview the course resolution in Articulate Storyline before publishing:
1. Click on the “Home” tab.
2. Select “Preview” from the options.
3. Choose “Project” to see how the resolution will appear.
4. Review and make any necessary adjustments before finalizing the publishing settings


This article on Articulate Storyline resolution is a fantastic resource, perfect for both beginners and experienced Articulate Storyline users. Your step-by-step guide made it so much easier for me. Thanks!
We appreciate your feedback! We are glad to know that our step-by-step guide has made your Articulate Storyline journey easier.